
Feature Mapping – a simpler path from stories to executable acceptance criteria
Introduction
Writing good acceptance criteria is one of the keys to effective software delivery. But it's hard. This article looks at Feature Mapping, a new technique that can help teams write higher quality acceptance criteria more easily.
An Executable Specification is a Definition of Done that you can run as a test. In Behaviour Driven Development (BDD), we refer to acceptance criteria as "executable specifications". Executable Specifications are meant to be clear, unambiguous, written in business terms, and easy to automate. Each acceptance criteria is a concrete example of how a user interacts with the system to achieve some business goal.
The most well-known format for BDD acceptance criteria uses the "Given-When-Then" structure:
Given <some precondition>
When <something happens>
Then <we expect some outcome>
This format is a great way to make sure that we are thinking in terms out the outcomes we want to achieve. After all, the outcomes of an application are where the value lies.
These scenarios are also easy to automate with BDD tools like Cucumber and Specflow.
When Given-When-Then goes wrong
But not everyone finds the Given-When-Then format easy or natural. It is prone to misuse, especially when folk are new to BDD.Imagine we are writing a school web application. Students submit their essays, and a teacher marks them. She gives a score between 0 and 10 in each of three categories (spelling, reasoning, relevance). If a student scores less than 7 in any category, the teacher can return the essay to the student. The student can then review the paper and submit an improved version. If the student gets a good score, the essay goes into the student’s official results.We might write an acceptance criteria using the "Given-When-Then" format" like the following:
Scenario: An essay that scores less than 5 in any area should be returned
to the student for correction
 Given Stuart the student has submitted his Politics 101 essay for review
 And Tess the teacher has chosen the essay to mark
 When Tess gives the essay a mark of 4 in spelling, 6 in reasoning and 6
   in relevance
 Then Tess should be able to return the essay to Stuart to be corrected
This scenario gives a nice illustration of one particular path through the application workflow.
However, I often also see acceptance criteria that look more like this:
Scenario: Reviewing an essay
 Given a teacher opens a students essay to review
 Then she should be able to enter the marks for each category
 And if the 'reasoning' mark is less than 7, then the 'relevance' mark
   cannot be above 6
 And the minimum mark in any category should be 0
 And if a mark is below 0, then the user shall get a "Mark not allowed"
   error message
 And if the marks are 6 or below, then the 'return to student for
   correction' button should be enabled
There’s a lot of stuff going on here, way more than we would want to check with any one automated test. There are some useful business rules buried in the text, but they are all mixed together in a single scenario. This makes the requirement harder to understand and harder to automate. It also increases the risk of ambiguity or misunderstanding. This undermines one of the main motivations behind BDD, to build a shared understanding within the team.
Acceptance criteria like this take time and effort upfront for BAs to write. And they generate even more rework when it comes to converting them to a format that we can automate. What's worse, they create a disconnect between the product owner and the team: the acceptance criteria they helped write and review end up being quite different to the ones that appear in the automated acceptance tests.
Of course we could teach BAs to write better Given-When-Then scenarios. But while it is a great idea for BAs to learn more about BDD, it turns out there are faster and more efficient ways to get high quality acceptance criteria.
Introducing Feature Mapping
In the rest of this article, we look at a technique that can make it faster and simpler to go from user stories to executable acceptance criteria. Acceptance criteria that the business can relate to, and that we can automate as part of our automated acceptance test.
Feature Mapping is a simple collaborative practice designed to help teams write great executable specifications. Feature Mapping draws on Jeff Patton's Story Mapping, Matt Wynne's Example Mapping and other techniques.
In a nutshell, the process goes something like this:
- Define a feature or story, or pick one from the backlog
- Understand what actors are involved in the story
- Break the feature into tasks to identify the main flows
- Identify examples that illustrates a principle or variant flow. Ask questions like "But what if...", "what else could lead to this outcome", "what other outcomes might happen", and use the answers to create new examples. Use rules to explain and give context to your examples
- Rinse and repeat for other rules and examples
- Create Executable Specifications: automate the main high-level flows with pending steps
You can see the big picture in the following diagram:
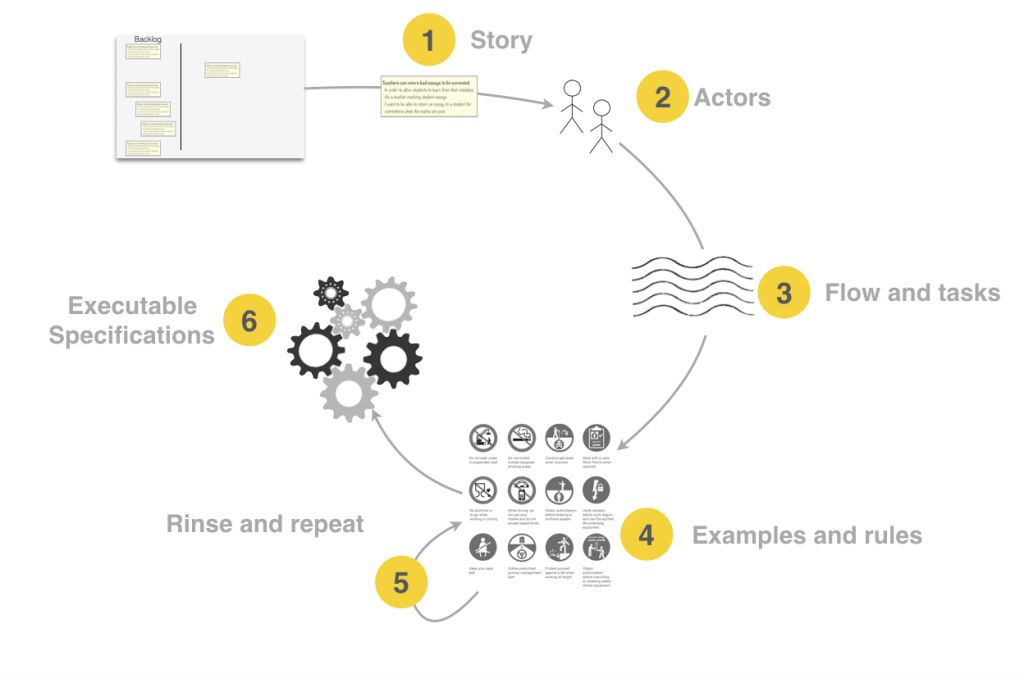
Figure 1: The Feature Mapping process
You use Feature Mapping when you need to define the acceptance criteria for a story from the backlog. Depending on your team, it can be during or around the Sprint Planning sessions, or closer to when work on the story starts. Feature Mapping sessions should be short and snappy. Under half an hour for a well-understood story is typical.
Feature Mapping works best as a collaborative activity. Many teams use the classic Three-Amigos trio:
- A BA or product owner, representing business knowledge;
- A developer, representing the technical perspective;
- And a tester, to make sure the requirements are testable.
BAs might write some initial acceptance criteria for the story beforehand, and that’s great. But these acceptance criteria can simply be one-liner business-rules, and not fully-blown Given-When-Then statements.
We start with the story
Feature Mapping starts with a feature or story, typically from your existing product backlog. Suppose we have the following story for our school application:
Feature: Teachers can return bad essays to be corrected
In order to allow students to learn from their mistakes
As a teacher marking student essays
I want to be able to return an essay to a student for corrections when
  the marks are poor
For this story, a BA might note down the following initial business rules:
- The minimum mark in any category should be 0
- If the 'reasoning' mark is less than 7, then the 'relevance' mark cannot be above 6
- A teacher can return an essay to a student if any mark is 6 or below
- A teacher must return an essay to a student if it is being reviewed for the first time and at least one mark is below 5
In a less ideal world, you might have a story with acceptance criteria that look like the ones we saw earlier. I find that acceptance criteria like these tend to need a fair bit of refactoring. It is often easier to consider them as a starting point for discussions than as the first version of the acceptance criteria.
If a story doesn’t have any initial acceptance criteria or business rules to start with, that’s fine too. You will discover them during the Feature Mapping exercise.
As a rule, good acceptance criteria avoid mentioning user interfaces, field formats, buttons and so on. Mockups or wireframes are a much better place to document these requirements.
We understand the actors
Most stories involve at least one, and sometimes several, actors. Understanding what actors are involved helps us reason about the tasks they need to perform to achieve the story goals. In our case, we can identify two actors:
- the student who submits the essay (let's call this actor Stu),
- and the teacher, who marks the essay (Tess).
We break the feature into tasks or steps
Next we break the feature into steps or tasks. How does the actor (or actors) interact with the application to achieve the goal of this story? What tasks do they need to perform? If you were manually demonstrating how this feature worked, or that it worked, what are the steps you would need to do? This is like Story Mapping, but we are focusing on a particular feature or story, rather than trying to get a high level view of the application.
In the story shown above ("Teachers can return bad essays to be corrected"), we might identify five main tasks:
- The student submits his essay for marking
- The teacher opens the essay
- The teacher records marks for each category
- The teacher returns the essay to the student for correction
- The teacher saves the final results
When we lay them out horizontally, we get something like this:
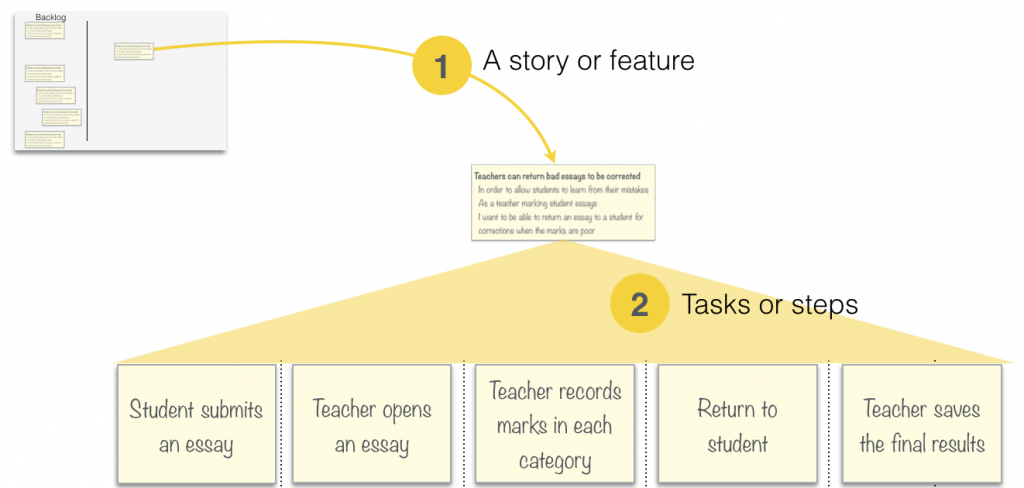 Figure 2: We break a story into tasks or steps
Examples, Rules and Questions
Finding examples
Once we have an idea of the tasks or steps involved in achieving the story goal, we talk through concrete examples of these steps. Each example illustrates a different flow through the steps. For our first example, we explore what happens when Stu submits a great essay:
- Stu got 9 in every category so his essay is saved in the final results
If we map this out into the various tasks we identified earlier, we would get something like this:
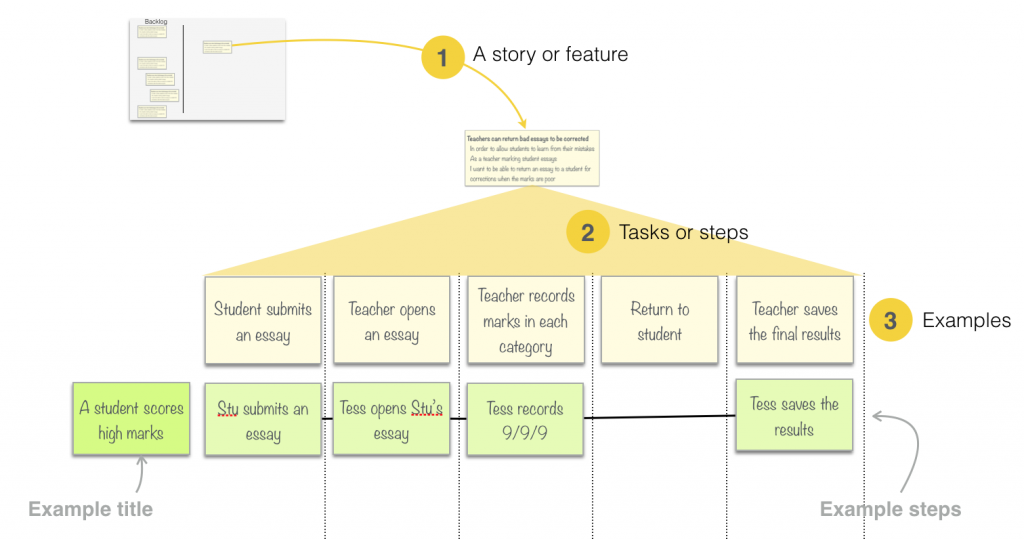
Figure 3: Mapping examples
This example might be called a "happy path", but we don't stop here. We look for other examples that illustrate different flows through the story. At each step or task, we can ask questions like: "what else could happen here?" and "what other inputs would change the outcomes?"
For example, what happens if Stu submits a poor essay? We could write another example, like the following:
- Stu got 4 in spelling and his essay is returned for correction
If we map this on our feature map, we might get something like this:
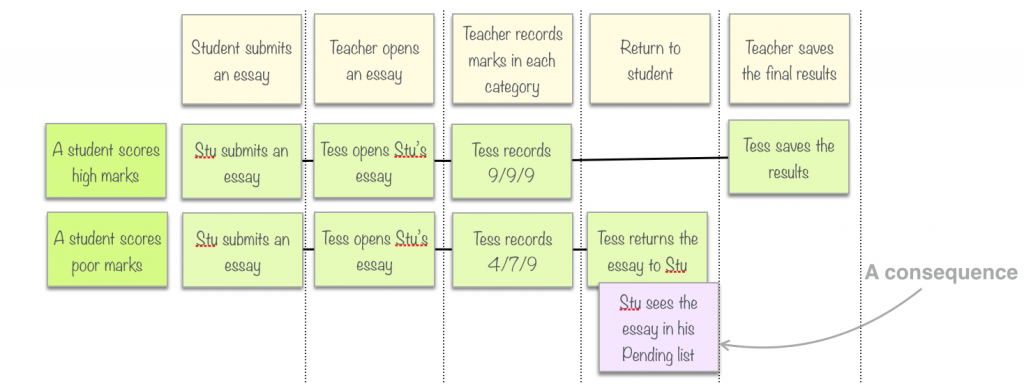
Figure 4: Adding a counter-example
Examples and consequences
In the map in Figure 4 I've added a second row in the examples, to represent the case where Stu submits an essay but forgot to use the spell checker. There is something interesting happening in the 'Return to Student' column. I have added a task card (in yellow) called "Tess returns the essay to Stu", but this seems a little inconclusive. The real goal is that Stu receives the essay to correct, not just that Tess has sent it. How do we know that Stu actually received it? To make sure this is the case, and to emphasise the actual outcome we want, I’ve added a Consequence card (in mauve) next to the task where Tess returns the essay to Stu.
Sometimes the map reads more clearly if you have a consequence for each example row. This is especially good for examples that involve calculations.
Sometimes you want to record the consequences for each example more explicitly. Figure 5 shows a Feature Map for a feature about what grade should be awarded for different results. An average of 9 or more is an A, an average of 7-8 is a B, and so forth. In this Feature Map, we add a special Consequence column that contains the consequence of each example row. If you have a lot of consequences that you want to express explicitly, a consequence column can make the map easier to read.
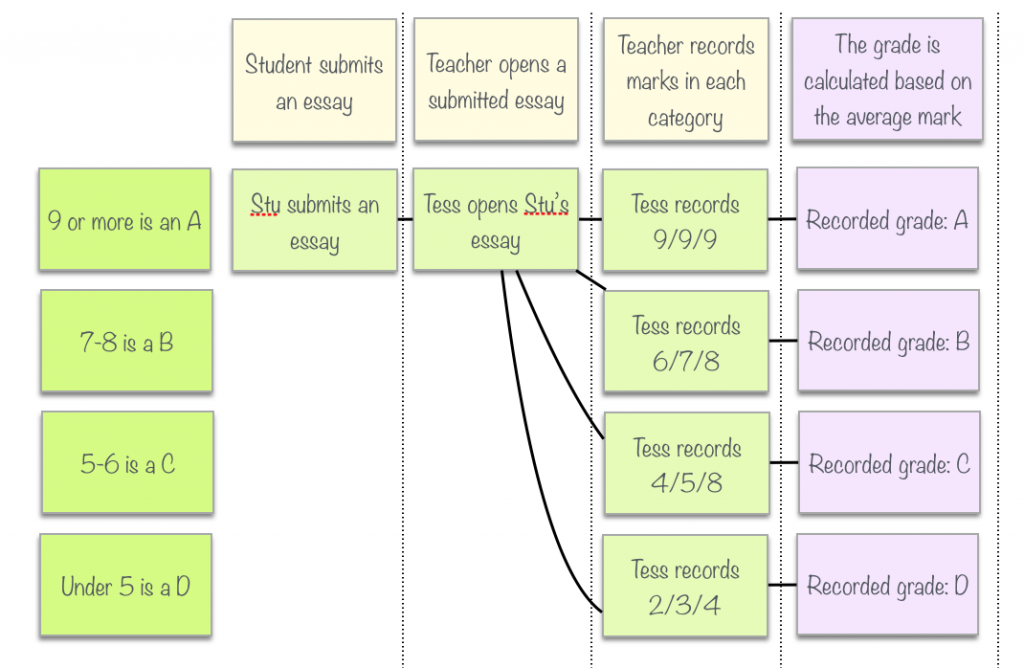
Figure 5: A column of consequences
You don't always need Consequence cards. Many task cards have an implicit consequence that can be shared and understood through conversation between team members. But often they are handy when you want to communicate the expected outcomes more clearly.
This conversation might lead to other examples. Stu got a 4 in spelling, but good marks in other areas, so Tess gave him a chance to correct his work. What would happen if he scored 4 in every category? Would Tess still give him a second chance? What if this was the second time he submitted his essay? And so on. Each of these could become an example. Some, might even be refactored as acceptance criteria for a different story.
You may notice the way I have used lines to connect the tasks, to show the branches and variations in the flow. I find this makes the map clearer and easier to understand. But you could also just repeat the tasks, and have a full row of tasks for each example if you find this expresses your intent better.
Rules explain the examples, examples illustrate the rules
In Example Mapping, we say that examples illustrate business rules, and business rules explain (or give context to) the examples. Both of the previous examples illustrate the same business rule: A teacher can return an essay to a student if any mark is 6 or below. To make this clearer, we can add a card to represent this rule at over the example title cards, as we do with Example Mapping:
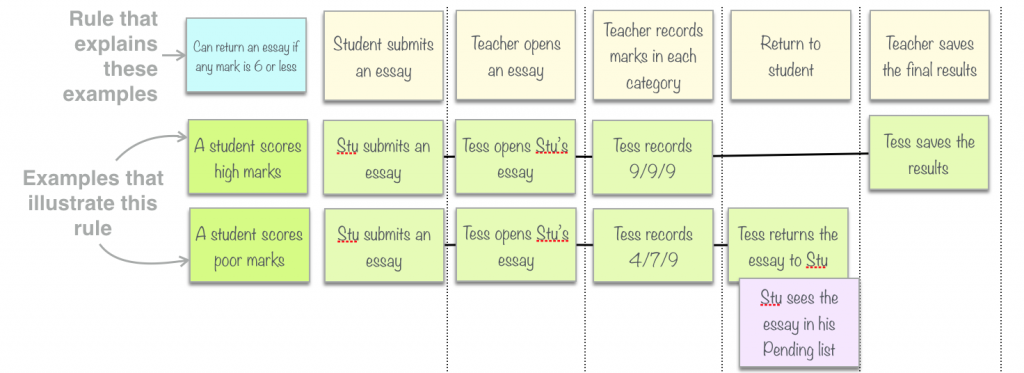
Figure 5: Rules explain examples
This lets us explore the scenarios in two dimensions. If we already have an idea of the rules (or some of the rules), we can take a rule and walk through some concrete examples that illustrate this rule. This helps us explore our understanding of the rules by looking for examples and counter-examples. Or we can continue to work through examples ("what else could happen in this task? How would that affect the outcome"), and add rules to explain the new examples as we need them.
We don't need rules for all the scenarios. Many scenarios illustrate the overall flow of a feature, so the rule is simply the goal of the feature. If our application allowed a teacher to return an essay to a student no matter what the mark, the "Can return an essay if any mark is 6 or less" would be unnecessary. In this case, we wouldn't need a rule card for the right-most column. Rather, the overall goal of the feature ("the teacher should be able to return an essay to a student for corrections when the marks are poor") could act as an implicit rule.
Questions highlight uncertainty
The third element of Example Mapping comes into play when you discover something that no one knows. Suppose you know that some subjects marked on a scale of 1 to 10, whereas others from 0 to 10. The BA is aware of this rule, but doesn’t know what subjects it relates to, or whether it is in scope for this story. So she writes it down on a Question card (a pink one, using the Examples Mapping conventions). I like to place these cards under the step they relate to, to give them some context and help identify complexity. A step or task with a lot of questions indicates a lot of uncertainty, and might need refactoring into a story of it’s own.
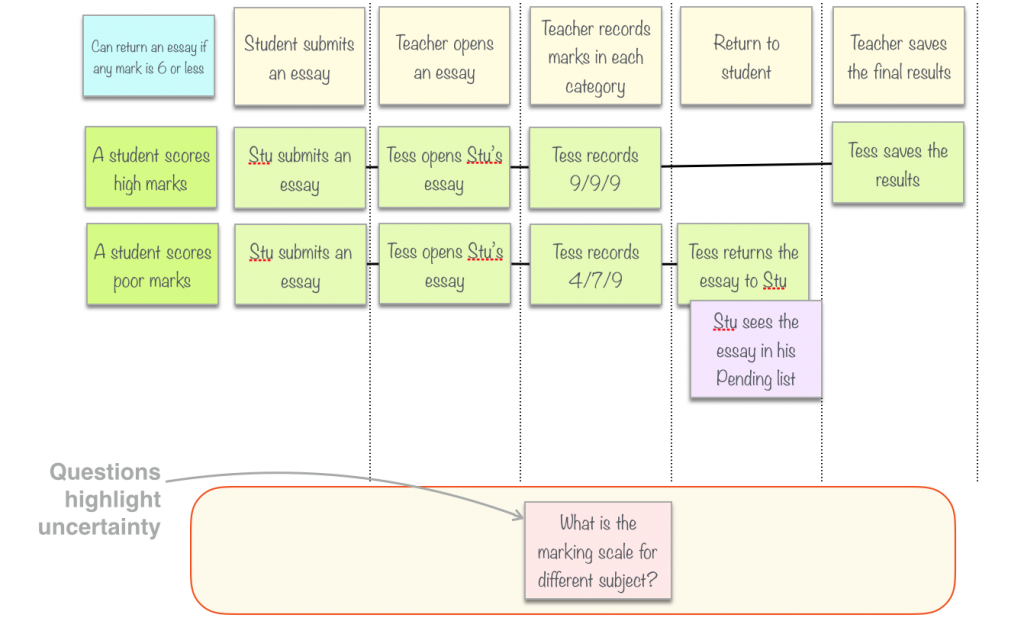
Figure 6: Questions highlight uncertainty
Working with negative cases
The examples we've seen so far could be described as "happy-day cases", smooth flows through the story. But our acceptance criteria should also describe negative scenarios, especially if they are important to the business. Negative scenarios help understand the positive scenarios better, and help flush out incorrect assumptions or missing details.
Acceptance criteria should record both positive and negative scenarios. However, not all negative scenarios are useful. Field validation rules are fine if the rules relate to business requirements. But a scenario checking for badly-formatted dates or numbers would normally be reserved for unit testing.
For example, the rule that a teacher can return an essay if there is a mark of 6 or under begs the question: can a teacher return an essay if the marks are good? This would justify a separate scenario:
- Tess records 9/9/9 for Stu's essay and tries to return it, but she is not allowed to.
The new example could be mapped out like this:

Figure 7: Counter-examples complete the picture
Let’s look at another requirement. Suppose, after some investigation, we learn that the History Department has a police where History exams get a score from 1 to 10. Furthermore, our system needs to cater for history essays.
To illustrate this rule properly, we really need two examples:
- one that shows that you can't enter a 0 mark for a History exam,
- and another to show that we can enter a 0 mark for some other subject.
We could use examples like these:
- Tess records 0/1/2 for Stu's English essay and it is returned for correction
- Tess records 0/1/2 for Stu's History essay but she is not allowed save the marks
We could add all of these examples to the feature map as shown here:
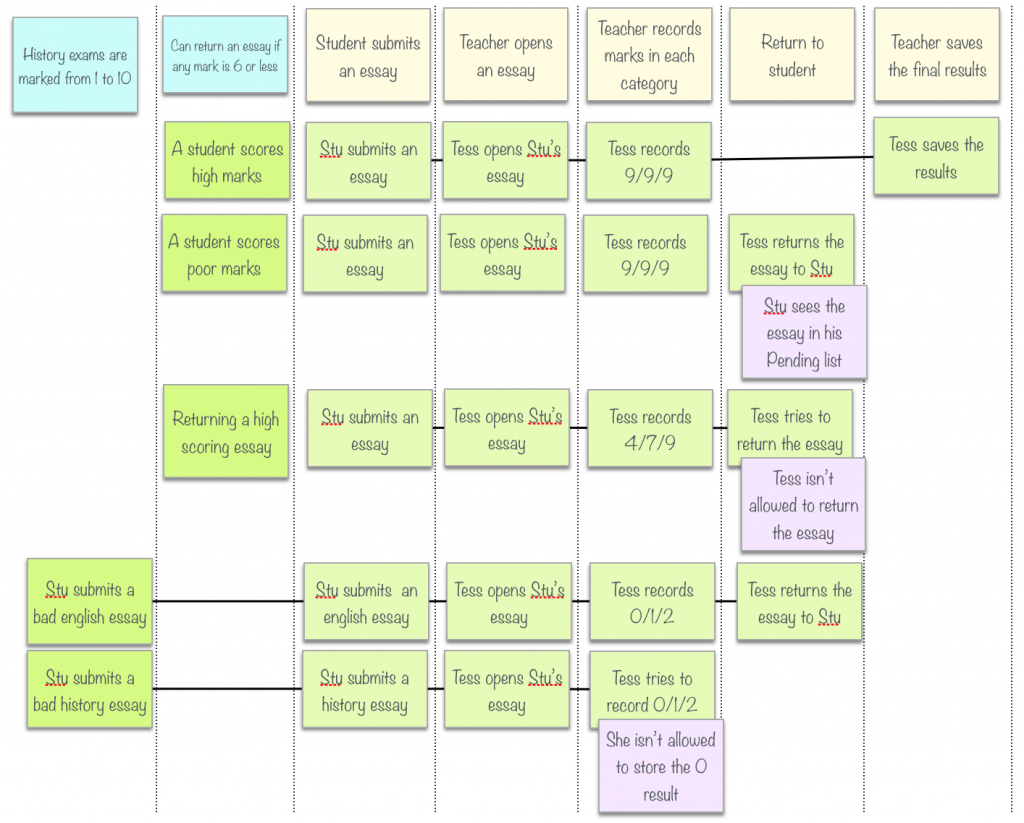
Figure 8: Representing negative scenarios
Note how we have described the negative outcome. We just place a corresponding Consequence card underneath the task where it happened.
Adding extra details
Sometimes we want to add some extra information. We might want to add the error message that should be displayed if an invalid mark is entered. Or we might want to add a table of test data describing different variations of the same scenario (for example, different mark weightings for different subjects). I generally put these details on the task card (if there is room), on back of the task card, or sometimes on a card underneath the main task card. The main thing is to have them handy so that we can refer to it later when we automate.
From Feature Mapping to Test Automation
One of the nice things about this approach is that we can start automation immediately. Each example maps to a clear sequence of business-level tasks, which in turn are easy to automate.
Feature Mapping with Cucumber
In Cucumber, for example, we can map the steps more-or-less directly to steps in the Cucumber scenario:
Scenario: Returning an essay to the student for correction
 A teacher can return an essay to the student to be corrected if any mark is 6 or less

Given that Stuart has submitted an essay on 'Politics 101' to be marked
 And that Tess has opened the essay
 When Tess records the following marks:
 | Spelling | Reasoning | Relevance |
 | 6        | 6         | 6         |
 And Tess returns the essay to Stuart to be corrected
 Then Stuart should the 'Politics 101' essay in his Pending Correction list
Feature Mapping with ScreenPlay in JUnit
Using the Screenplay pattern in Java with Serenity BDD, with either JUnit or Cucumber, we could automate these steps like this:
Actor tess = Actor.named("Tess").whoCan(MarkPapers);
Actor stuart = Actor.named("Stuart").whoCan(SubmitPapers);

givenThat(stuart).wasAbleTo(
    Submit.anEssayAbout("Politics 101")
);
andThat(tess).wasAbleTo(
    ReviewTheEssay.from(stuart).about("Politics 101")
);

when(tess).attemptsTo(
     RecordMarks(of(6).in(Spelling), of(6)).in(Reasoning), of(6).in(Relevance)),
     ReturnTheEssay.forCorrections()
);

then(stuart).should(
    seeThat(HisEssays.thatAre(PendingCorrection), contains("Politics 101"))
);
Notice how cleanly the tasks map to steps in Cucumber and Java. The structure of the automated tests map closely to the business flow in the examples. This makes both the reporting clearer and the code easier to understand.
At this point, you can automate minimal implementations for your tasks, and you will have a pending executable specification which will act as a starting point for your test automation efforts.
Conclusion
I have found this process very useful for many different types of projects. The clear process it defines makes it easy to pick up for less experienced teams. And mapping out the examples is a great way to flush out the finer points of the requirements. Like Example Mapping, it may be overkill for very simple stories, and will unveil complexity in larger ones. The process should be easy and flow naturally. If it doesn’t, be sure to ask yourself why, and adjust course accordingly.
A special mention goes to Jan Molak, author of Serenity/JS and a major contributor to the Screenplay pattern, for contributing to the Feature Mapping model, reviewing the article and providing valuable suggestions.
We love helping teams adopt better practices! If you'd like to learn more about how we can help your team get the most out of BDD, be sure to take a look at our brand new Low Tech High Impact Sprint Planning workshop and our other BDD training workshops.